Development
AI project auditing: identifying ROI and validating possibilities


This quick article clarifies our AI Auditing phase.
Goal
According to a recent survey from Statista, “only 15% of enterprises are using AI as of today, but 31% are expected to add it over the coming 12 months”. Osedea’s AI Project Auditing offering caters to organizations that need to validate their AI plan, train management and business leaders on AI and its possibilities, set up a solid AI strategy, get recommendations on AI infrastructure, or evaluate projected return on investment for AI-based endeavours.
Current market issue
There’s a lot of hype about AI these days, and almost every corporation is investing in it. Unfortunately, a significant number of AI projects come to a screeching halt before getting into production. This happens due to unrealistic expectations, an unpracticed AI application development approach, unsustainable infrastructure, and a lack of understanding of the proper AI application development lifecycle.
Our approach
Osedea’s AI team will collaborate with the client team to understand their process, review their infrastructure and AI plan, and go through their data to find out what is possible to achieve and what is unrealistic.
AI Auditing Week Timeline
Day 1
A two-hour interactive workshop on AI business cases, AI application development life cycle, AI integration approach, and AI market trends - along with Q&A. For a quick overview of this workshop, here's our latest webinar introducing AI for business leaders.
Days 2 and 3
Client shares requirements & sample data, Q&A to understand objectives, data definition, and discussion of data format/amount, available infrastructure, and end goal.
Day 4
Osedea’s team evaluates sample data, reviews the approach, and breaks down the overall requirements with proper justifications.
Day 5
Osedea presents an overall end-to-end solution that is technically feasible and cost-effective. Limitations, proposed quick wins, and different phases of the development process are discussed.
Expected Outcomes of the AI Project Auditing process
- Day-long workshop and presentation on AI for business leaders, IT teams, and executives
- Data review to flag issues with data
- Process review: dividing requirements into incremental iterations
- Based on the data and process review, compile a list of possible AI applications
- Define complexity, timeline, and resources needed in different AI applications for short- and long-term planning
- Help set up a robust AI strategy for the organization
- Collaborate with the client’s business leaders to create an AI roadmap
- Provide recommendations on AI infrastructure and architecture, in order to incorporate AI with existing systems
- Provide necessary guidance for the IT team to maintain future AI products and infrastructure
- Return on investment and production-graded AI application development planning
If you have any question or comments, do not hesitate to reach out to us.

Did this article start to give you some ideas? We’d love to work with you! Get in touch and let’s discover what we can do together.
Further Reading
Capitalizing on your organization’s data with vector databases

At Osedea, we’re constantly at the forefront of emerging technologies, and we have a unique perspective on tech adoption trends among our diverse client base. In recent months, AI has made its way into mainstream media with the help of ChatGPT. Since then, tooling and support for AI development have skyrocketed. Just a few weeks ago, Dr. Andrew Ng, a globally recognized leader in AI, delivered a talk on the opportunities in AI which highlighted the importance of integrating AI into your organization's workflow.
BEARING.ai—the first company to harness the power of Generative AI in the maritime shipping industry—is a great example of how AI adoption can quickly reap tremendous benefits. Leveraging their data to monitor, forecast, simulate, and optimize, BEARING.ai’s clients have achieved substantial improvements in shipping vessel performance while simultaneously reducing fuel costs and carbon emissions, contributing to a greener environment. Similar opportunities aren't distant dreams; they’re within grasp. AI is ripe for adoption, and the key to unlocking its full potential lies in harnessing your organization's data.
The benefits of centralizing data
For many established companies, data has been accumulating for years across various departments and systems. PDFs, images, presentations, emails, audio, video, and analytics are treasure troves of information (and significant assets when harnessed correctly). The first step towards adopting AI within your organization is centralizing your data. Centralization (consolidating from various sources/locations into a single repository or system) by implementing a unified data management platform or integrating existing systems through middleware solutions offers numerous benefits:
AI-Powered Knowledgebase: Once centralized, data can be organized and indexed efficiently with the help of embedding models. These models are trained to extract the most meaningful information out of your unstructured data. By indexing your data in this manner, Large Language Models such as GPT-4 can have their context extended with your organization's business context to evolve into a comprehensive, all-knowing assistant. This innovative approach is known as retrieval augmented generation (RAG) with vector databases, a concept we will delve into shortly.
Training Predictive Models: The consolidated data pool becomes a valuable resource for training AI models. Predictive analytics, forecasting, and trend analysis become achievable goals as you capitalize on your organization's historical data.
Security Benefits: Centralizing data provides a more robust security infrastructure to safeguard sensitive information. It allows for more effective access control and auditing, reducing the risk of data breaches.
Easier Backups: Centralized data is easier to back up than data from multiple disparate sources. This simplifies data protection measures, ensuring critical information is securely preserved and recoverable in case of data loss incidents.
Redundancy: Implementing redundancy, such as data mirroring or replication, becomes more feasible with centralized data. Redundancy enhances data availability and fault tolerance, minimizing downtime, and ensuring business continuity.
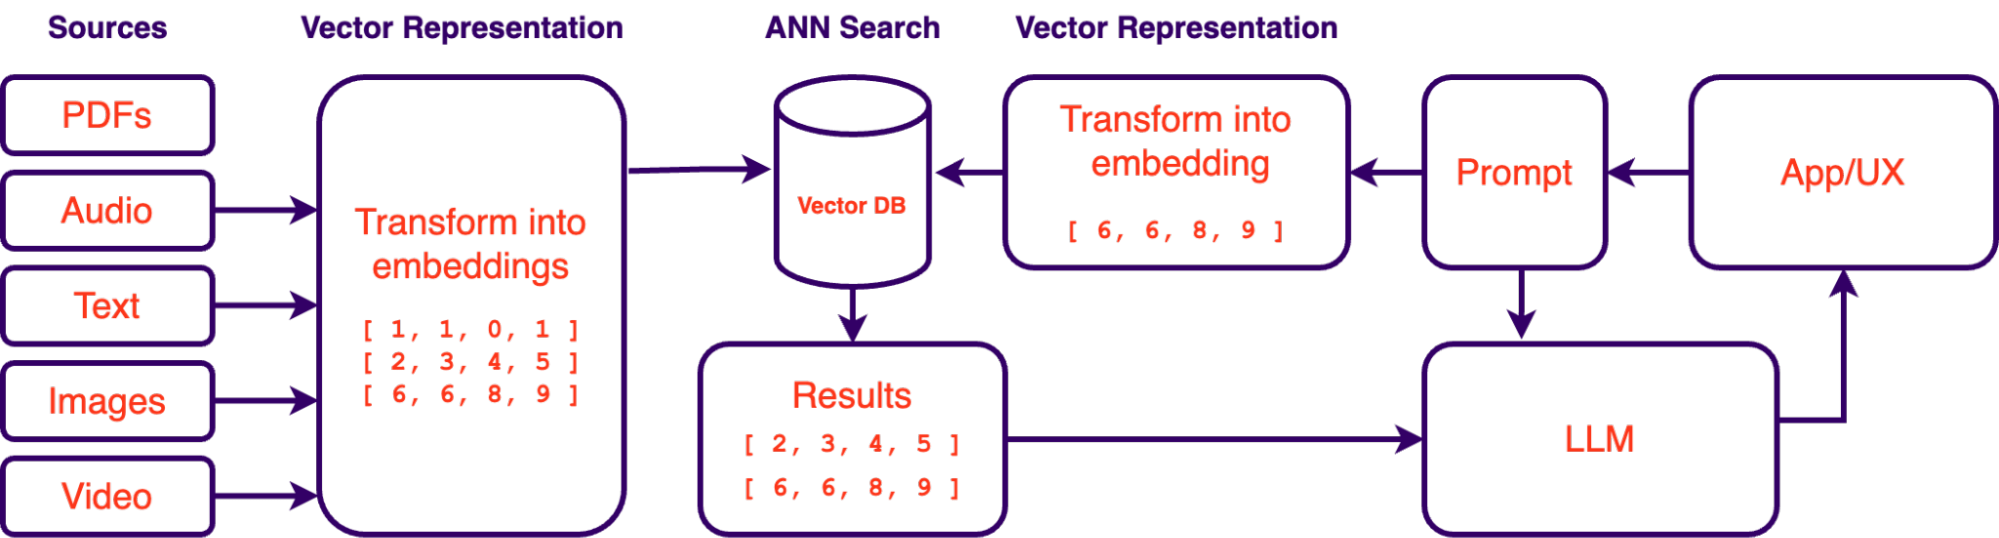
Building an AI-powered knowledgebase
As mentioned above, retrieval augmented generation systems (RAG) have gained prominence as a valuable solution for querying an organization's data using large language models (LLMs). RAG systems allow for querying data with natural language. Essentially, it gives you a way of “talking” to your data in the same way you talk to ChatGPT. The accessibility of LLMs in recent months has made this approach a lot more feasible which is why this approach to data exploration is quickly gaining traction. However, the success of such systems depends not only on LLMs and prompt engineering but also on the proper vectorization and indexing of data. This is where vector databases and embeddings play a crucial role.
What are Vector Embeddings?
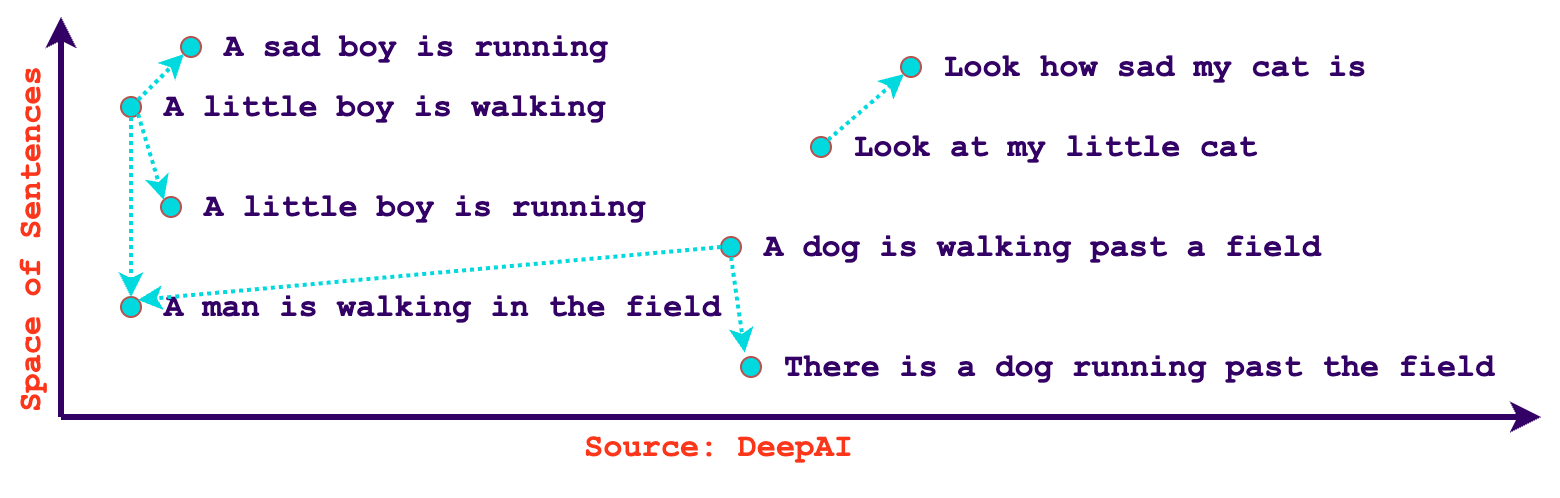
In the context of AI and machine learning, vector embeddings are a numeric representation of an entity's semantics. These representations capture essential features and relationships within the data, making it easier for AI algorithms to process and understand. Embeddings are crucial for tasks such as natural language processing, recommendation systems, and image recognition. With embeddings, we can quickly find related content based on similarity. Additionally, embeddings aren’t just limited to text, it’s possible to create vectors out of images, audio, video, or any type of data using encoder models that have been trained to extract their meaningful information. Some models like OpenAIs text-embedding-ada-002 are even language agnostic, meaning that they can understand similarity in various languages natively.

What are vector databases?
A vector database is a specialized database designed to store and retrieve high-dimensional vector embeddings efficiently, making them ideal for AI and machine learning applications. They use approximate nearest neighbor (ANN) search algorithms to measure the distance between embeddings, resulting in a ranked list of neighboring vectors.
As an example, Spotify has been using vector databases for quite some time to compare users' taste in music, they also go into detail on how they’ve used embeddings to query their podcast episodes in their blog post: Introducing Natural Language Search for Podcast Episodes. They’ve even gone as far as creating their own ANN library!
Use cases for vector databases
Vector databases are well-suited for a wide range of use cases that involve similarity search, recommendation systems, and data analysis in fields such as machine learning, natural language processing, computer vision, and more. Here are some common use cases for vector databases:
Recommendation Systems: Vector databases are often used in recommendation systems to find items or content that are similar to what a user has interacted with in the past. This can be applied to e-commerce, content recommendation, and music or video streaming platforms.
Content-Based Search: In multimedia content platforms, vector databases enable content-based search for images, audio, and video files. Users can search for content with similar visual or auditory features.
Anomaly Detection: Detecting anomalies in high-dimensional data, such as network traffic logs, sensor data, or financial transactions, can be done using vector databases. Unusual data points can be identified by comparing them to a set of normal vectors.
Collaborative Filtering: Collaborative filtering algorithms can use vector databases to find users with similar preferences and recommend items based on the behaviour of similar users.
Long-term Memory: Vector databases can be used to store past response generations for an LLM. These embeddings can be recalled to further enhance a large language model’s context with its past context.
Clustering: In vector databases, clustering can be applied to organize data into distinct groups, making it easier to identify patterns and similarities within the dataset.
Diversity Measurement: In vector databases, diversity measurement can be applied to evaluate the breadth and inclusivity of recommendations, ensuring a balanced selection of items or content to cater to a wide range of user preferences or topics.
Pitfalls of embedding models and vector databases
While embeddings are powerful, they are not without their challenges. It's important to be aware of potential pitfalls, such as bias in the training data. As an example, OpenAI explains in their documentation how they’ve witnessed a model more strongly associate European American names with positive sentiment when compared to African American names. Additionally, embedding models have cutoff dates on their training data, meaning some data might differ in semantics throughout time (e.g. a celebrity’s popularity). Selecting the right embedding techniques and parameters is critical to achieving optimal results and correct data pre-processing techniques need to be applied to correctly leverage embeddings.
Vector databases are only half the solution
While vector databases and embeddings are essential components of AI adoption, it's crucial to recognize that they’re part of a more extensive ecosystem. Building a robust AI infrastructure involves addressing other key aspects, such as data preprocessing, model selection, prompt engineering, and deployment strategies. Vector databases are a powerful piece of the puzzle, but they are not the entire solution.
One of the recurring issues with LLMs and AI as a whole is the tradeoff in accuracy. For ages, computers have been binary and deterministic. Although vector databases may be a monumental step forward in knowledge exploration, they still need to be married to traditional structured architectures for the ultimate search experience. Some platforms such as Azure Cognitive Search and Elastic Search are actively working and fine-tuning hybrid searches using reciprocal rank fusion (RRF) to mix resulting ranks. Elastic is also addressing other vector database issues such as privacy of data and role-based access control (RBAC). On the prompt engineering side of things, various frameworks like guidance ai, Langchain, and LMQL are all being developed to provide a robust way of turning LLM data into meaningful structured responses. Needless to say, we are living in exciting times and emerging RAG architectures are only getting better each day.
At Osedea, we recognize the potential of vector databases, embeddings, and AI in driving transformative changes within organizations. Our comprehensive development services are designed to empower your organization in leveraging its data and fully realizing the potential of AI. Whether it's centralizing data, implementing vector databases, or navigating the complexities of AI adoption, Osedea is here to be your trusted partner on the path to data-driven success. Rest assured, we remain at the forefront of emerging technologies and are committed to staying on top of the latest advancements in the field.
Reactive rich domain models in React+TypeScript

Over the last few years, we’ve seen the world of web frameworks explode. Many new frameworks have emerged to seemingly all solve the same problem. That is: how do we solve the complexity problem in our frontend applications? Each framework deals with this issue in various ways and has their own pros-and-cons. As companies lock themselves into specific framework stacks, they start hiring “expert” software developers in those frameworks. A quick search on LinkedIn reveals that Redux is a core necessity for some companies alongside React.
My team and I have explored various ways of dealing with the growing complexity in our stack. One of the reasons for this complexity is the extensive business logic in our frontends. Our frontend applications require immediate feedback to users. Our users are potentially in remote areas with slow internet connectivity and waiting on backends for business logic is unfeasible. The application configures data in real-time and calls the backends to create visualizations of that data. The configuration of the data is rarely committed to storage and therefore the round trip to the backend is unnecessary. With our frontend containing a lot of business logic, we started to wonder: why is it so hard to add new functionality to our growing business needs?
In literature, solving business logic complexity is done in a myriad of ways. Domain Driven Design (DDD) seems to be a favorite of many. Especially if you have a strong Object Oriented mindset. As I previously mentioned, a large amount of business logic is found in our frontend, specifically a React based frontend. Up to today, we wanted to code everything within the React ecosystem, with very little custom tooling, therefore we used Redux because of its integration with React. This approach is fine, however, you end up with an anemic domain model, usually only a type interface. Although anemic models work well, you then end up with many Redux “services” or “helper files” to deal with the business logic of those anemic models. This has the consequence of spreading out the business logic across many files.
There was only one question I asked myself over the past 6 months while developing a new subset of our application. With a monolithic frontend, locked in a tech stack 2 major versions behind, and a complex spaghetti of helper files; I wondered, why are we here in the first place? How do we reduce the versioning hell? How do we integrate the business logic that is spread out into multiple helper files? Some of our helper files were 3 thousand lines long, it contained the business logic for our 15+ entities. How did we get here? After a relatively small step back, our team identified that Redux was one of the root causes. Redux suggests Anemic domain models, and therefore suggests separating the business logic into helper files. We wanted to know if there was a way to integrate rich domain into React+Redux in a way that we don’t have to rewrite our entire frontend, or to create our own frameworks. We’ve scouted the internet to find an answer to this question, to no avail.
Let me take a step back to clarify anemic vs. rich domain models if you’re not familiar with DDD principles. Everybody has different definitions of Domain driven design. For the purpose of this article, DDD is a way to map code to real world concepts. Important principles in DDD include the creation of Domain models, that is, a class (usually) that uniquely defines a real-world concept. Below, I go into two important variations to these domain models.
Anemic domain models
Anemic domain models are objects without any business logic associated with their definitions. They are usually represented in TypeScript by a single interface, known as a Data Transfer Object (DTO). The interface describes the shape of the JavaScript object, using TypeScript type-checking we can ensure proper usage. This interface is not connected to any other model and has little-to-no methods for business logic. It certainly does not have its own state transitions. Here is a typical example in TypeScript:
export interface MyPetShopDTO {
   readonly id: number;
   readonly storeName: string;
   readonly pets: MyPetDTO[];
}
This is perfect, it would work with Redux and React as is. However, it does not have any business logic. What happens if you want to update this model’s name in a typical React+Redux application?
To propagate your changes to your Redux store, you’d have to:
- Create a Redux selector to get this model in your components
- Add an event listener to an input in a component
- Dispatch an event to Redux to update this name in their state
- Catch that event in Redux using a Slice action
- Find the entity in our Redux state, usually by using an entity ID
- Recreate an object for the entities (using spread operators) in our state, otherwise Redux doesn’t let React re-render
- React re-renders the entire tree, passing through the React reconciliation to know which props have changed and which component to update.
- If a prop changes, re-render all the children all the way down to your component. No matter if this name is used in a tiny part of your application.
Sounds like a pain to write. In this case, all of that work, for a basic example of a name change. Let’s compare this to how you would typically assign a variable change in regular JavaScript without a framework.
myPetShop.storeName = 'Montreal Pets'
A typical React+Redux application requires 8+ steps to accomplish something that JavaScript does in a single step. Not only that, but requires developers to be aware of all the steps mentioned above. Due to the high complexity of the steps above, the software industry often creates copy-pastable boilerplate of the entire Redux hierarchy. Developers can then copy-paste the snippets they need to make the code run. They don't stop to analyze the complete code flow, through these third party libraries. Without understanding the complete flow, how can we expect developers to write unit tests? Especially when doing trivial things like changing a pet's name. In React+Redux this would require nearly 15 lines of code in a unittest's beforeEach clause? And that is, without any business logic tested yet. It feels like we are drowning in framework lingo that has been building up overtime without taking a step back and thinking about what we are even doing in the first place.
Anemic domain models - Business logic
Let’s add some business logic to our anemic model. The pet store employees may add or remove pets that are available for adoption. These pets have various configuration options filled via a modal. On modal close, the pet is added to the pet store.
export const slice = createSlice({
  name: 'petStoreSlice',
  initialState,
  reducers: {
    addPet(state, action: PayloadAction<MyPetDTO>) {
      const hasPet = state.petStore.pets.find(
        (pet) => pet.id === action.payload.data.id
      );
      if(!hasPet) {
        const defaults = getPetDefaults(action.payload.data);
        const newPet = {...defaults, ...action.payload.data);
        state.petStore = {
          ...state.petStore,
          pets: [...state.petStore.pets, newPet]
        }
      }
    },
Rich domain models
What if we lived in a world where our data and our business logic are in the same place. Agnostic of any frameworks. The ability to import these across frontend application stacks. JavaScript is JavaScript, it can be used regardless of the rendering framework used. Unit testing our application becomes significantly easier, you no longer need to mock and handle all of these frameworks. Separation of concerns is easier to enforce if you plan your models correctly according to separation of concerns and context boundaries.
A good understanding of your entities and the interactions between them is required, as well as the context in which they live… But that is a discussion for another day. Typically a tech lead/developer of a project will have done the analysis upfront and determined the models, their interactions and their business logic. Even if it isn’t upfront, an object oriented approach will significantly help the future flexibility of your applications by having encapsulation and inheritance.
What would a rich domain model look like in TypeScript?
export interface PetStoreDTO {
   id: number;
   storeName: string;
   pets: PetDTO[];
}

export interface IPetStore extends PetStoreDTO {
   pets: IPet[];
   addPet: (newPet: IPet) => void;
   removePet: (pet: IPet) => void;
   createOffspring: (parent1: IPet, parent2: IPet) => IPet;
}
Notice how we keep the PetStoreDTO from the anemic domain model, however we create a new interface that extends it. In this new interface, we indicate that concrete implementations will contain 3 functions. Add a pet, remove a pet and create offspring. Note that the `pets` array was overridden in this interface with a new type: the IPet type. The DTO of the pet store only contains the raw JSON of the pets, but not the class-based models. However the interface of the pet store (and/or the class based model of the pet store) does have pets as models. To remedy this change between DTOs and models, the interface properties are overridden.
The concrete implementation of this class could look like:
class PetStore implements IPetStore {
   id: number;
   storeName: string;
   pets: IPet[] = [];

   addPet(newPet: IPet) {
       this.pets.push(newPet);
   }
}
Notice how simple this is, you can compile this down from TypeScript to JS and import it into any other JS projects.
All fun and games, but what would that look like with React?
Well, that’s where things get interesting. React doesn’t like class instances. React uses an algorithm called “Reconciliation” to know which props have changed and which components need to re-render. It knows which props have changed by looking at object references (similar to C pointers) in their props, aka shallow comparaison. When using class based entities, changing values within those classes do not cause the reference of the class entity to change therefore React would not consider this a prop change and would thus not re-render.
Let’s take this a look at this example:
// Instantiated somewhere else
const petStore = new PetStore({
   id: uuidv4(),
   storeName: 'Montreal Pets',
   pets: []
});

// React Component:
const PetStoreHome: React.FC = () => {
   const onAddPet = () => {
       petStore.addPet(new Pet());
   }
   return (
       <div>
           <p>Pet store: ${petStore.storeName}</p>
           <PetList petStore={petStore} />
           <button onClick={onAddPet}>Add Pet</button>
       </div>
   );

};
In this case, we are instantiating a new class to hold the petStore, potentially in another file (ex: a service file, a repository, perhaps Redux). If we do any changes to petStore, React will not rerender this component. Furthermore, PetList will not re-render even if we call addPet on petStore. Class based instances in React are truly problematic because of the Reconciliation algorithm only checking for reference equality.
The PetStore model is a rich domain model because it contains business logic (ex. addPet) however it isn’t “reactive” in React. Changing any of the values within the model does not cause any re-renders. We found a way to use rich domain models and have React… react to changes.
Reactive Rich Domain Models in React
To accomplish this, we needed a way to listen to any and all changes on a model class. Changing a single property or a myriad of properties on a class should cause all or some of the react components to re-render to reflect those changes. Not all components in the DOM/React tree will need to be re-rendered though. A change in the store name shouldn’t cause re-renders in the PetList. To listen to changes made on a model class, we used the Proxy API and a base class that would be extended by our models.
class PetStore extends BaseModel implements IPetStore {
   ...
   constructor(petStore: PetStoreDTO) {
       super();

       ...
   }
The only thing that changes is the “extends” directive and the super call within the constructor. Everything else is exactly the same.
We also created a React Hook that would link up with the base model and register a callback on property changes:
// React Component:
const PetStoreHome: React.FC = () => {
   useModelUpdate(petStore, 'storeName');
   ...
}
The hook only updates this component if the ‘storeName’ property on the petStore model is changed. Since the PetList component only requires the petStore as a prop, which never changes reference between renders, the PetList component isn’t re-rendered, gaining a huge performance boost.
If we want to add a pet, then the `PetStoreHome` component doesn’t need to be re-rendered, only the PetList component should be re-rendered. This can be accomplished by adding a new hook registration in the PetList component:
const PetList: React.FC<PetListProps> = ({petStore}) => {
   useModelUpdate(petStore, 'pets'); // array changes (ex: push, pop, splice, etc)
   return (
       <ul>
           {petStore.pets.map((pet) => <PetDetails pet={pet} />)}
       </ul>
   );
};
If a pet changes name, then only the PetDetails would need to be re-rendered by using a new hook registration. Any other changes to “pet” (ex. id changes) would not cause a re-render:
const PetDetails: React.FC<{ pet: IPet}> = ({ pet }) => {
   useModelUpdate(pet, 'name');
   return (
       <li>{pet.name}</li>
   );
}
As you could imagine this is an extremely powerful way to render your React components by explicitly controlling the React update flow. Only requiring components to re-render if properties they use changes. Perhaps sometimes you don’t even need any re-rendering if properties of a class changes. Some properties of some models do not have a visual representation and are only used internally for calculations of derived properties, or they should only be applied during an event.
A world without Redux in React
Although there are various ways to handle state in React, a popular package is React-Redux. It’s a global state management package. Its primary goal is to streamline state management. It’s a fairly large package that forces us to develop in certain ways. In a typical React+Redux application you can find hundreds if not thousands of “useDispatch” and “useSelector” hooks littered throughout the code. Each anemic model has dozens of actions, state reducers, thunks and selector functions.
Testing the Slices becomes extremely difficult as we have to remember the useSelector sequence to properly mock the implementation or we have to create an entire store for our unit tests. My team took quite a bit of time to get the slice testing under control and we ended up ditching unit testing slices in favor of Cypress end-to-MockAPI testing.
With rich domain models, we can get rid of actions, state reducers and selector functions. After removing most of redux’s core principles, we were left with just thunks. That left me with two questions: How do I get rid of these thunks, and where do we keep our rich domain models?
I found an answer to this question in some domain driven design principles: the repository. Similarly to a slice, the repository holds the state of a model and defines the thunks. A single class to handle all the backend communications and store models. The OG BFF.
class PetStoreRepository extends BaseRepository {
   myPetStore: IPetStore | null = null;
   isFetching = false;
   lastError: unknown = null;

   async fetchPetStore() {
       if (this.isFetching) {
           return;
       }

       this.isFetching = true;

       try {
           const response = await backend.get<PetStoreDTO | null>(
               'localhost:8888/api/pet-store',
           );
           if (response.data) {
               this.myPetStore = new PetStore(response.data);
           }
           this.lastError = null;
       } catch (e: unknown) {
           this.isFetching = false;
           this.lastError = e;
       } finally {
           this.isFetching = false;
       }
   }
}
const petStoreRepository = new PetStoreRepository();
export default petStoreRepository;
So how do we use this in a React application?
// React Component:
import petStoreRepository from ‘repositories/petStoreRepository’;
const PetStoreHome: React.FC = () => {
   useRepositoryUpdates(petStoreRepository); // Re-renders if any property changes
   const petStore = petStoreRepository.myPetStore;
   const isLoading = petStoreRepository.isFetching;

  useEffect(() => {
       if(!petStore && !isLoading) {
           petStoreRepository.fetchPetStore();
       }
    }, [petStore, isLoading]);

   if(isLoading) {
       return <p>Loading...</p>;
   }
   if(!petStore || petStoreRepository.lastError) {
       return <p>An error occurred</p>;
   }
   ...
}
This is very similar to how you would do it with Redux with a dispatch call. Except we don’t have a dispatch call. This reduces our selectors since we use the repository directly, mocking becomes essentially effortless for testing purposes. The code is much more readable. Updating any of the pet properties in event handlers is straightforward. You no longer need to go on a dispatch action chase within the code to find the ultimate state change. Debugging is straightforward with class based entities, the React debugger displays the class variables in the debug tree. The only loss, which our team didn’t use, was the time travel ability of the Redux package.
Conclusion
Further tests of the Rich Domain Models + React would require a mix of breadth and depth in an application using this approach. The examples used in this article were extremely limited in complexity. However, our application seemed to truly benefit from these rich domain models both in performance, in simplifying the complexity of code, and in readability. This approach may also be more stable as time goes on: updates in packages would be relatively simple to implement, the real reactiveness comes from the BaseModel class and the useModelUpdate hooks. The approach detailed in this article works with both class based React, and hook based React, hopefully the next major version of React is as easy to integrate into this Reactive Model strategy. Changing the implementations for future updates in React would only require 2 file changes.
Object Oriented Programming isn’t too popular in the frontend frameworks and packages discourage us from using this pattern. As our applications become more and more complex, and business logic starts belonging in the frontend, our tools and frameworks need to adapt to this. As it is, React and Redux doesn’t make OOP a viable pattern, and yet it is an extremely powerful way to write applications. I may suggest trying this solution out if you have a lot of business logic and you know the boundaries between your entities. If you need validation and immediate interactivity in the frontend, this may also be a viable option for your applications. If you want to have an Object Oriented Programming pattern in your React applications without losing the benefits of React and without too much hassle, this approach may be for you.
One of my colleagues, wrote a blog on Handling global state in React in 2022, in which he details the various libraries available on the NPM registry for global state management.
Note: This approach was not benchmarked. I have no idea what the performance looks like depending on the breadth and depth of your application versus other popular packages. I also cannot guarantee that the GitHub gists will work for all entities and all cases (very very deeply nested object updates across arrays and objects?). Any feedback, suggestions and comments is welcome in the GitHub gist and if you have any questions do not hesitate to reach out to us.
Photo credit: Christopher Gower
A minimalist approach to DataOps and MLOps with DVC and CML

In this article, we'll look into the critical importance of DataOps and MLOps in software and AI development. We will showcase a hands-on MVP approach, emphasizing the use of DVC (Data Version Control) and CML (Continuous Machine Learning), integrated with Git, to illustrate these concepts effectively.
- Practical Approach: Using DVC and CML, we demonstrate a real-world, minimal viable product (MVP) approach to DataOps and MLOps.
- Integration with Git: Highlighting the seamless integration of these tools with Git, we show how familiar workflows can be enhanced for data and model management.
- Effective Implementation: Our goal is to provide clear guidance on effectively implementing DataOps and MLOps practices.
Common Issues in AI & Data Projects
- "Which Data Version?"Are you constantly losing track of the data version used for model training?
- "Is the New Model Any Good?"Stop wondering if your latest model beats the old one or what changed between them.
- "Why's Our Repo So Heavy?" Bloated GitHub repository with data?
What is Understanding DataOps and MLOps
DataOps and MLOps are foundational practices for modern software development, particularly in AI. These approaches are essential for effectively managing the data and machine learning model lifecycles.
- Scalability: Efficiently managing data (DataOps) and machine learning models (MLOps) is critical to building scalable and robust AI systems, crucial for software development projects.
- Performance and Reliability: Implementing these practices ensures consistent system performance and reliability, which is especially vital for startups operating in dynamic and resource-constrained environments.
- Pitfalls to Avoid: Many development teams need to correctly version data and models or take a reactive approach to system management, leading to significant challenges in reproducibility and increased error rates, hindering growth and innovation.
Understanding and integrating DataOps and MLOps into workflows is not just beneficial; it's a strategic necessity.
The MVP Approach
The MVP (Minimal Viable Product) approach in DataOps and MLOps is all about aligning with the core principles of the Agile Manifesto, emphasizing simplicity, effectiveness, and deployment.
- Agile Principles: Emphasize simplicity, effectiveness, and people-first processes, promoting flexibility and responsiveness in project management.
- Reducing Dependency on Complex Systems: Advocate for minimizing reliance on complex SaaS and proprietary systems, thus maintaining control and flexibility in your development.
- Effective Tools: Leverage tools like DVC and CML that integrate with familiar Git workflows; this approach ensures seamless adoption and enhances team collaboration and efficiency.
Adopting an MVP approach means creating more agile, adaptable, and efficient workflows in DataOps and MLOps, allowing for the development of robust and scalable solutions without getting bogged down by unnecessary complexities.
Hands-On
Now, we dive into the practical aspects of setting up a Python environment and using essential tools like DVC, CML, and SciKit-Learn. We'll go through configuring a GitHub repository for effective version control and demonstrate building and evaluating a model using SciKit-Learn in a Jupyter Notebook.
- Setup: Set a Python environment and install DVC, CML, and SciKit-Learn.
- Model Building: Use SciKit-Learn with a built-in dataset in a Jupyter Notebook for a simple model training and evaluation demonstration.
- Streamlined Process: Configure GitHub and Git to execute and assess your model.
Install Python Environment
We'll use Poetry to manage our Python environment. Poetry is a Python dependency management tool that allows you to create reproducible environments and easily install packages.
# Install Poetry
pipx install poetry

# Init Poetry project
poetry init

# Add dependencies
poetry add dvc cml scikit-learn
Loading the Data
We'll use the Breast Cancer Data Set from the UCI Machine Learning Repository.
Key characteristics:
- Number of Instances: 569.
- Number of Attributes: 30 numeric, predictive attributes, plus the class.
- Attributes: Measurements like radius, texture, perimeter, area, smoothness, compactness, concavity, concave points, symmetry, and fractal dimension.
- Class Distribution: 212 Malignant, 357 Benign.
import sklearn.datasets

# Load dataset
data = sklearn.datasets.load_breast_cancer(as_frame=True)
print(data.data.info())
Implementing External Settings for Data and Model Adjustments
We'll use external configuration files, like settings.toml, to dynamically adjust data and model parameters. This approach adds flexibility to our project and underscores the importance of versioning and tracking changes, especially when introducing intentional alterations or "bugs" for demonstration purposes.
Degrading the Data with External Settings
Because the demonstration dataset performs well with a simple model, we'll artificially degrade the data to emphasize the importance of tracking changes and versioning.
- External Configuration: Utilize settings.toml to set parameters like num_features=1, which dictates the number of features to be used from the dataset.
- Data Manipulation: We dynamically alter our data by reading the num_features setting from settings.toml. For instance, reducing the dataset to only one feature:
python
import toml

settings = toml.load("settings.toml")
data.data = data.data.iloc[:, : settings["num_features"]]
print(data.data.info())
Training the Model
We'll use SciKit-Learn to split the data and train a simple model.
python
import sklearn.model_selection

# Split into train and test
X_train, X_test, y_train, y_test = sklearn.model_selection.train_test_split(
data.data, data.target, test_size=0.3, random_state=42
)
python
import sklearn.linear_model

# Train a simple logistic regression model
model = sklearn.linear_model.LogisticRegression(max_iter=1000)
model.fit(X_train, y_train)
python
# Evaluate the model
predictions = model.predict(X_test)
accuracy = sklearn.metrics.accuracy_score(y_test, predictions)
print(f"Model Accuracy: {accuracy:.2f}")
Model Accuracy: 0.91
python
# View the classification report
report = sklearn.metrics.classification_report(y_test, predictions)
print(report)

# Export the report to a file
with open("report.txt", "w") as f:
f.write(report)
                  precision    recall  f1-score   support

               0       0.93      0.83      0.87        63
               1       0.90      0.96      0.93       108

        accuracy                           0.91       171
       macro avg       0.92      0.89      0.90       171
    weighted avg       0.91      0.91      0.91       171
python
import seaborn as sns
import matplotlib.pyplot as plt

# Create a confusion matrix
confusion_matrix = sklearn.metrics.confusion_matrix(y_test, predictions)

# Plot the confusion matrix
sns.heatmap(confusion_matrix, annot=True, fmt="d")

# Export the plot to a file
plt.savefig("confusion_matrix.png")
Saving the Model and Data
We'll save the model and data locally to demonstrate DVC's tracking capabilities.
python
from pathlib import Path

# Save data
Path("data").mkdir(exist_ok=True)
data.data.to_csv("data/data.csv", index=False)
data.target.to_csv("data/target.csv", index=False)
python
import joblib

# Save model
Path("model").mkdir(exist_ok=True)
joblib.dump(model, "model/model.joblib")
Implementing Data and Model Versioning with DVC
Until now, we have covered the standard aspects of AI and machine learning development. We're now entering the territory of data versioning and model tracking. This is where the real magic of efficient AI development comes into play, transforming how we manage and evolve our machine-learning projects.
- Better Operations: Data versioning and model tracking are crucial for AI project management.
- Data Versioning: Efficiently manage data changes and maintain historical accuracy for model consistency and reproducibility.
- Model Tracking: Start tracking model iterations, identify improvements, and ensure progressive development.
Streamlining Workflow with DVC Commands
To effectively integrate Data Version Control (DVC) into your workflow, we break down the process into distinct steps, ensuring a smooth and understandable approach to data and model versioning.
Initializing DVC
Start by setting up DVC in your project directory. This initialization lays the groundwork for subsequent data versioning and tracking.
dvc init
Setting Up Remote Storage
Configure remote storage for DVC. This storage will host your versioned data and models, ensuring they are safely stored and accessible.
dvc remote add -d myremote /tmp/myremote
Versioning Data with DVC
Add your project data to DVC. This step versions your data, enabling you to track changes and revert if necessary.
dvc add data
Versioning Models with DVC
Similarly, add your ML models to DVC. This ensures your models are also versioned and changes are tracked.
dvc add model
Committing Changes to Git
After adding data and models to DVC, commit these changes to Git. This step links your DVC versioning with Git's version control system.
git add data.dvc model.dvc .gitignore
git commit -m "Add data and model"
Pushing to Remote Storage
Finally, push your versioned data and models to the configured remote storage. This secures your data and makes it accessible for collaboration or backup purposes.
dvc push
Tagging a Version
Create a tag in Git for the current version of your data:
git tag -a v1.0 -m "Version 1.0 of data"
Updating and Versioning Data
- Make Changes to Your Data:
-Modify your data.csv as needed. - Track Changes with DVC:
-Run dvc add again to track changes:
dvc add data
- Commit the New Version to Git:
- -Commit the updated DVC file to Git:
git add data.dvc
git commit -m "Update data to version 2.0"
- Tag the New Version:
- -Create a new tag for the updated version:
git tag -a v2.0 -m "Version 2.0 of data"
Switching Between Versions
- Checkout a Previous Version:
- -To revert to a previous version of your data, use Git to checkout the corresponding tag:
git checkout v1.0
- Revert Data with DVC:
- -After checking out the tag in Git, use DVC to revert the data:
dvc checkout
Understanding Data Tracking with DVC
DVC offers a sophisticated approach to data management by tracking pointers and hashes to data rather than the data itself. This methodology is particularly significant in the context of Git, a system not designed to efficiently handle large files or binary data.
How DVC Tracks Data
- Storing Pointers in Git:
-DVC stores small .dvc files in Git. These pointers reference the actual data files.
-Each pointer contains metadata about the data file, including a hash value uniquely identifying the data version.
- Hash Values for Data Integrity:
-DVC generates a unique hash for each data file version. This hash ensures the integrity and consistency of the data version being tracked.
-Any change in the data results in a new hash, making it easy to detect modifications.
- Separating Data from Code:
-Unlike Git, which tracks and stores every version of each file, DVC keeps the actual data separately in remote storage (like S3, GCS, or a local file system).
-This separation of data and code prevents bloating the Git repository with large data files.
Importance in the Context of Git
- Efficiency with Large Data:
-Git struggles with large files, leading to slow performance and repository bloat. DVC circumvents this by offloading data storage.
-Developers can use Git as intended – for source code – while DVC manages the data.
- Enhanced Version Control:
-DVC extends Git's version control capabilities to large data files without taxing Git's infrastructure.
-Teams can track changes in data with the same granularity and simplicity as they track changes in source code.
- Collaboration and Reproducibility:
-DVC facilitates collaboration by allowing team members to share data easily and reliably through remote storage.
-Reproducibility is enhanced as DVC ensures the correct alignment of data and code versions, which is crucial in data science and machine learning projects.
Using DVC as a Feature Store
DVC can be a feature store in machine learning workflows. It offers advantages such as version control, reproducibility, and collaboration, streamlining the management of features across multiple projects.
What is a Feature Store?
A feature store is a centralized repository for storing and managing features - reusable pieces of logic that transform raw data into formats suitable for machine learning models. The core benefits of a feature store include:
- Consistency: Ensures uniform feature calculation across different models and projects.
- Efficiency: Reduces redundant computation by reusing features.
- Collaboration: Facilitates sharing and discovering features among data science teams.
- Quality and Compliance: Maintains a single source of truth for features, enhancing data quality and aiding in compliance with data regulations.
Benefits of DVC in Feature Management
- Version Control for Features: DVC enables version control for features, allowing tracking of feature evolution.
- Reproducibility: Ensures each model training is traceable to the exact feature set used.
- Collaboration: Facilitates feature-sharing across teams, ensuring consistency and reducing redundancy.
Setting Up DVC as a Feature Store
- Organizing Feature Data: Store feature data in structured directories within your project repository.
- Tracking Features with DVC: Use DVC to add and track feature files (e.g., dvc add data/features.csv).
- Committing Feature Changes: Commit changes to Git alongside .dvc files to maintain feature evolution history.
Using DVC for Feature Updates and Rollbacks
- Updating Features: Track changes by rerunning dvc add on updated features.
- Rollbacks: Use dvc checkout to revert to specific feature versions.
Best Practices for Using DVC as a Feature Store
- Regular Updates: Keep the feature store up-to-date with regular commits.
- Documentation: Document each feature set, detailing source, transformation, and usage.
- Integration with CI/CD Pipelines: Automate feature testing and model deployment using CI/CD pipelines integrated with DVC.
Implementing a DVC-Based Feature Store Across Multiple Projects
- Centralized Data Storage: Choose shared storage that is accessible by all projects and configure it as a DVC remote.
- Versioning and Sharing Features: Version control feature datasets in DVC and push them to centralized storage. Share .dvc files across projects.
- Pulling Features in Different Projects: Clone repositories and pull specific feature files using DVC, enabling their integration into various workflows.
Best Practices for Managing a DVC-Based Feature Store Across Projects
- Documentation: Maintain comprehensive documentation for each feature.
- Access Control: Implement mechanisms to regulate access to sensitive features.
- Versioning Strategy: Develop a clear strategy for feature versioning.
- Automate Updates: Utilize CI/CD pipelines for updating and validating features.
Streamlining ML Workflows with CML IntegrationIntegrating Continuous Machine Learning (CML) is a game-changer for CI/CD in machine learning. It automates critical processes and ensures a more streamlined and efficient workflow.Setting Up CML WorkflowsCreate a GH Actions workflow within your GitHub repository, ensuring it is configured to run on every push or PR.name: model-training
on: [push]
jobs:
run:
runs-on: ubuntu-latest
steps:
- uses: actions/checkout@v4
- name: Install Poetry
run: pipx install poetry
- name: Set up Python
uses: actions/setup-python@v4
with:
python-version: "3.10"
cache: "poetry"
- name: Install dependencies
run: poetry install --no-root
- uses: iterative/setup-cml@v2
- name: Train model
run: |
make run
- name: Create CML report
env:
REPO_TOKEN: ${{ secrets.GITHUB_TOKEN }}
run: |
echo "\`\`\`" > report.md
cat report.txt >> report.md
echo "\`\`\`" >> report.md
echo "" >> report.md
cml comment create report.md
Conclusion: Boosting Software and AI Ops
In wrapping up, we've delved into the core of DataOps and MLOps, demonstrating their vital role in modern software development, especially in AI. By mastering these practices and tools like DVC and CML, you're learning new techniques and boosting your skillset as a software developer.
- Stay Agile and Scalable: Adopting DataOps and MLOps is essential for developing in the fast-paced world of AI and keeping your projects agile and scalable.
- Leverage Powerful Tools: Mastery of DVC and CML enables you to manage data and models efficiently, making you a more competent and versatile developer.
- Continuous Learning and Application: The journey doesn’t end here. The true potential is realized in continuously applying and refining these practices in your projects.
This is more than just process improvement; it's about enhancing your development workflows to meet the evolving demands of AI and software engineering.
Embracing clarity and structure: adopting the C4 model for software architecture diagrams
In the ever-evolving landscape of software development, our Software Design and Quality Team (SDQT) at Osedea is continuously seeking ways to refine our development workflows. Each month, we gather to engage in deep discussions about the latest and emerging trends in technology. From delving into modern trade-off analyses in distributed architectures to keeping updated with new tools and frameworks, we strive to maintain agility in our software development life cycle. This article explores the advantages of the C4 model in technical communication, highlighting its descriptive approach, use of contrasting colors, and ability to streamline the documentation process. Additionally, it offers practical tips for getting started with the C4 model and underscores its transformative impact on presenting technical aspects of projects to clients.
A few months ago, we introduced the C4 model by Simon Brown into our discussions. After experimenting with the model on various occasions, we quickly realized that this model should become a standard in our approach to creating architectural diagrams. The transition from our traditional methods to this new approach wasn't just a change in technique, but a significant shift in how we perceive and communicate complex system designs.
What is the C4 model?
The C4 model, based on the 4+1 architectural view model, can be compared to a multi-layered map for software architecture. It allows us to view a system at various levels of abstraction, similar to how you might navigate Google Maps - from an aerial view of the world down to individual streets and buildings. In C4, each “C” represents a different type of model at a different level of detail. These different levels are known as context, containers, components, and code:


Context: This is the highest level of the model, providing a big-picture view of the system. It shows how the software system interacts with its users and other systems. This is essential for understanding the system's boundaries and its relationships with external entities. This level is meant to be suitable for all stakeholders including non-technical users.

Containers: At this level, the focus shifts to the applications and data stores (like databases, file systems, etc.) that comprise the system. It illustrates how these containers interact with each other and the responsibilities they have within the system. This level is crucial for understanding the high-level technology choices and how the system is structured.

Components: This level breaks down the containers into their constituent components, detailing the responsibilities of these components and how they interact with one another. It's useful for developers and others involved in the build and design process, as it provides a more detailed view of the system's architecture.

Code: The most granular level, focusing on the individual classes and interfaces that make up the components. This level is particularly relevant for developers who need to understand the internal structure and design of the various components in detail. Most IDE’s have tooling available to generate these diagrams.
At this point, I’m sure you’re wondering why code is part of an architectural diagram. The beauty of this model is that you choose at what level of granularity you want to stop. Most of the time, the code portion is left out of these diagrams. For client presentations, we’ve found that the first and second layer is just right to convey a detailed overview of the architecture. The third layer comes in handy before the implementation phase to plan out the finer details.
What are the advantages of the C4 model?
At its core, the C4 model addresses a fundamental issue in technical communication: the conveyance of information. Often, technical diagrams are cluttered with technology-specific icons, which, while informative to some, can be perplexing to others—the C4 model advocates for a more descriptive approach. Instead of relying on symbols that might be familiar to only a subset of the team, it encourages explanations of what each technology does. This approach ensures that everyone, regardless of their familiarity with specific technologies, can understand the architecture.
The C4 model also emphasizes the use of contrasting colors instead of relying solely on color codes, making diagrams comprehensible even when printed in black and white. This consideration ensures that the diagrams remain effective and clear under different viewing conditions, including digital displays and physical printouts.
Additionally, the C4 model streamlines the documentation process, providing a clear and concise framework. This is particularly beneficial for complex systems where detailed documentation is crucial. By delineating different layers of the system, from the context down to the code level, the C4 model aids in creating comprehensive and structured documentation that can be easily understood and maintained.
How to get started with the C4 model?
In terms of tools for designing C4 diagrams, tools like Structurizr and Mermaid.js, which support the "C4 model as code" approach are often recommended. This method is advantageous during the development phase as it facilitates easy maintenance and updates to the diagrams. While C4 as code is preferred for its automated and maintainable approach, we’ve noticed that other tools like draw.io can also be beneficial. Despite being manual and potentially tedious, draw.io enables the creation of aesthetically pleasing diagrams that are well-suited for client presentations.
Implementing the C4 model has transformed how we present technical aspects of projects to our clients. It empowers them to choose the level of detail they wish to engage with. This flexibility enhances their understanding and allows for more meaningful discussions about the project.
As we move forward, our commitment at Osedea is to integrate the C4 model into all our architectural processes. We believe this approach will enhance our efficiency and clarity in software design. Keep an eye on future updates and insights from our SDQT team as we steadily progress in the ever-changing technology landscape. For those interested in evolving their software architecture or seeking guidance in modern development methodologies, Osedea is here to assist. Feel free to reach out for a discussion on how we can support your software development goals with our expertise and experience.
10 tips to boost your efficiency in VSCode with the Vim emulator extension

How Vim magic got me
A while ago, I was introduced by an enthusiastic senior colleague to the world of Vim. For those who are not familiar, Vim is a “highly configurable text editor built to make creating and changing any kind of text very efficient. It is included as "vi" with most UNIX systems and with Apple OS X.” You can use its Insert mode to type as usual, or switch to Command mode, which makes your whole keyboard commands, instead of just the usual few like Ctrl-Something.
After watching my colleague show off his favorite commands to do complex, swift and chirurgical text editing, without ever touching his mouse, I was quite impressed. That being said, my initial comment was: “but aren’t we just looking and thinking about code without typing like 80% of the time? Are you saving that much effort, given all the time it most certainly took to learn this stuff?”. My colleague lost his smile and went back to his desk scratching his chin and questioning his life decisions…
Fast forward a couple months later, I gave it a first try. It wasn’t very intuitive at first. Eventually, by practicing methodically like I used to do with my guitar, it started to feel a bit more fluid. I was witnessing all the potential, even though I was still very slow. I abandoned it for a while, and then a few months later, I decided to commit to it for a few weeks and soon enough I was like Jimi Hend… That guy with the chipped Yamaha at the metro station.
All my practice took place inside the default Vim editor of my Linux machine. At some point, I felt ready to start coding for real. Being used to VSCode, I discovered how Neovim, an hyperextension of Vim, could be configured to match most of the same features, but without ever touching a mouse. I was in for a long ride of configuration and having to learn a ton of other commands from other plugins (tmux, etc), while I was just touching the tip of the iceberg with Vim.

Thanks to a few YouTube videos by Ben Awad on the topic, I quickly discovered that a Vim extension existed for VSCode (it does for most popular IDEs also). That meant I could benefit from the wonderful features of VSCode, still use the mouse when I felt like it, and transition smoothly towards using more of Vim commands. The perfect combo of efficiency. VSCode on steroids.
Here are some loose tips I wanted to share for your VSCode + Vim journey. I’ll go over powerful Vim features and useful configurations. If we had time I would sneak in some guitar tunings, but you’ll have to wait for that.
Take it slow and have fun
It’s not trivial to become a Vim master (I don’t consider myself one). You can quickly learn the basics and gain a bit of efficiency. Like me, you can try it from time to time and put it at rest if it feels overwhelming. I saw it initially as a hobby and always prioritized becoming a better developer, before becoming a faster one. Have fun! There is even an online game that helps you learn Vim.
Start by owning your typing game
The Vim commands mapping is well adapted for the standard typing position (index fingers on “f” and “j”). Plus, there are a lot of useful commands using the numbers and special characters. Needless to say you should make sure to be comfortable with typing, without having to look at your keyboard. I personally had a really bad typing technique, not even using all my fingers, so I initially had to relearn how to type correctly, before I started Vim. The added bonus will be to type faster emails and Slack messages.
If you feel stuck, just press “i” and use VSCode as usual
The advantage of using a Vim emulator inside VSCode, is that at any time, you can just switch to Insert mode by pressing “i” — which in Vim means you can start typing text — and VSCode will become its old self again (mouse included). That is how you can still use the great VSCode features, like multi-cursor, which are sometimes more convenient than what Vim offers.

Swap the Caps Lock and Esc keys
We just saw that pressing “i” gets us into Insert mode. To get back to Command mode, we need to press Esc, but that key is not the nearest one from the default typing position, so Vim users rarely use that, and opt for a custom mapping. My personal favorite is swapping the Caps Lock and Esc keys, which can be done in various easy ways, depending on your operating system. Other popular options are a quick “jj” typing or “jk”.
Get that good settings.json setup
Vim has special commands with some of the Control/Command + key combos, but most are not as useful as the regular ones, in my opinion. You can easily override these Vim mappings in your VSCode settings.json files. There are a lot of other customization options. That’s the beauty of Vim, you can really mold it to your work preferences.
{ "keyboard.dispatch": "keyCode", "vim.handleKeys": { "<C-c>": false, "<C-v>": false, "<C-w>": false, "<C-f>": false, "<C-a>": false, "<C-b>": false, "<C-q>": false }}
Learn how to move around like a pro
The first thing you will learn is how to use “h j k l” which represent “← ↓ ↑ →”. It feels a bit odd at first because of the index finger switch, but you’ll soon get used to it. However, it’s not efficient to quickly move around, so I advise you to explore all the options. Here are a few:
- “e”, “w” and “b” will help you jump from word to word

- “^”, “0” and “$” to get to the first word / beginning / end of the line
- “{“ and “}” is very useful in code files to jump up and down blocks of texts (functions, objects, etc.)
- “zz” will center your active line in the middle of your window
Use that Vim macros dark magic
You won’t always use macros, but it is definitely one of my favorite features of Vim. One that truly feels like a superpower when you need it. When you press “q” and then any other letter key, let’s say “w”, you can record a series of commands and store them in that letter. You press “q” again to stop recording. Then, you can use “@w” to use that series of commands again. If used smartly, you can even do, for example, “10@w” to repeat an operation on ten lines of code. It sounds a bit confusing, but let me show you an example, where I change one format to another in seconds:

I recorded the operations I wanted on the first line, and then simply repeated that six times with one quick command. Imagine how much time you save for a file with a thousand lines !
Learn what’s more specific to code
Even though you can use Vim for any sort of text editing, the more complex syntax and structure of a code file is where it shines. Think about what you often do in a code file and see if there is a Vim command that can help you achieve it more efficiently. Here are some examples:
- “*” can be used to jump between instances of the same word (hello variables / functions)

- “ct}” for example (which could be translated to “change to }”), will delete everything before the bracket and put you in Insert mode

Pay attention to repetitive actions and get rid of them
You are catching yourself pressing “j” ten times in a row to go down some lines? Press “10j”. Same goes for jumping 4 words ahead, just do “4w”. Another useful one is “.” that will repeat the last command you did, a little bit like a mini macro.
There are many ways of achieving the same results. Pick your favorite and move on with your life
That’s all part of the fun with Vim. You practice a new command and integrate it into your workflow. Then you eventually discover an even more efficient one, and you repeat the process. Don’t stress out too much about using all the most optimal features and go at your own pace.
Useful resources
Here are some resources I found useful in my Vim journey:
- Official Vim website
- The VSCode Vim extension documentation
- Vim interactive tutorial
- Vim tips
- A great crash course by Ben Awad
- Vim cheat sheet
- Vim Adventures (learn while playing)
If you want to read more interesting and informative blogs take a look at our software development section and if you want to learn more about the world of Vim do not hesitate to reach out to us!
Photo credit: Pedro Costa
Adding more insight with Spot robot’s Autowalk Mission Evaluator (AME)
.jpg)
If you haven't read our blog post about the workflow service tool we developed for Spot robot that offers a simple UI to walk through a mission’s data and provide feedback to other team members, I suggest you read this first then come back to this article. If you are already familiar with the Autowalk Mission Evaluator (AME), keep reading!
Once manual inspections have been replaced by automated inspections in a company's workflow, it’s pertinent to have an efficient way to parse the captured data and reliably record historical feedback on said data. However, this base functionality is just that—a base that can be expanded upon.
We’ve updated the AME platform to include some new powerful features which will help users understand and compare audio data and annotate captured photos.
Introducing audio support
In the case of a factory or manufacturing plant, ensuring the health of the various machines running their processes is vital. Understanding this, we decided to add audio data support to AME so that clients can capture snippets of audio, just as they would with images. Engineers can then play the captured audio within the browser in order to listen for abnormalities or oddities (e.g. any hissing, changing rhythms, clunking, etc. that isn’t supposed to be there). The captured audio is compared against a “control” audio snippet so that even employees who are less familiar with the equipment being inspected can benefit from the tool.
This feature has a real impact. A maintenance team could catch potentially harmful issues early, such as a bearing giving out or identifying loose parts that might cause unexpected noises. Matched with the Spot’s ability to capture thermal images (and AME’s ability to view them), there is potential to prevent extended downtime.
Because audio data requires the user to take the time to listen to the snippet in full before gaining any insight on the situation, we wanted to add a more efficient way to parse the data. For this reason, we added in a visual waveform of each audio snippet. These waveforms can provide some quick insights based on the patterns we see or extreme values.

Furthermore, we’ve ensured users can compare the audio waveform with their control just as they can with images, allowing them to quickly compare audio tracks and see smaller differences which might not be obvious when looking at only the current data.
Because audio snippets can be initiated at any point in a machine’s cycle, it’s important to consider that there can be variances between the actual and the control data (especially when comparing the waveforms, as their patterns will likely be offset by a varying amount). In the future, we plan to introduce a parser to analyze the two audio snippets, find patterns and align them when possible.
Moving forward…
With this new feature in place, the AME tool can be fitted with client-specific logic to analyze the collected audio data to help provide more insights on the current state of whatever environment you are inspecting.
Let’s annotate
When providing insight on detected issues within visual media, it’s all well and good to record a simple description of the issue, however this isn’t very extendable. If we ask the user to properly annotate the data as they reject it, we can collect more usable information. These annotations can then be used to train a machine learning model to eventually detect the issues itself, making the AME tool more powerful and requiring less user input.
In order to collect such data, the AME platform is now equipped with an annotation tool which is presented to users when they “reject” an image datapoint. Here the user can click and drag a box over an area of the image and input short text to describe the issue, object, etc.

Once a user has submitted an annotation, the anomaly is then highlighted on the image and the corresponding annotation text is displayed in a list below the image. A user can then add more annotations, if needed, and finally submit their rejection when ready.

Once submitted, the annotation will be tied to the image in the predetermined location and thus can be seen in the initial viewing of the datapoint. This means that users will see annotations already made on any given image data and, of course, historically.
For more strict contexts, the AME can be fitted with a pre-approved list of “expected” annotations, leaving the user to simply select an annotation rather than provide it themselves. This approach would work well when the environment is well controlled and would only have a certain set of anomalies to detect.
Moving forward…
Now that the AME has such information in its database, machine learning tools can be used to leverage such added information to help provide further insights before users see the data.
Your turn!
Spot is pretty cool in and of itself, but one of its true powers comes in how it can be extended. We built AME to help free you up from routine evaluator tasks so you can focus on your business.
If you’re interested in hearing more about how Spot’s autowalk feature can help you, or how our AME tool can be integrated into your workflow to automate data collection, contact us.