Development

Dataset management during the implementation phase

A machine learning (ML) project involves several important steps, including defining the project objectives or the problem to be solved, setting up an appropriate dataset, working on the model, putting it into production and monitoring. We will come back to this later in another article. The phase that interests us today is that of setting up the dataset and, above all, its management.
Indeed, building the dataset that will be used to train the model is an important phase, I would say it is the most important of a project, because it is that phase that defines the way our model will be built (in terms of inputs). During this phase we are confronted with several problems, including
- The choice of datatype according to the problem we want to solve with the ML model;
- The way in which this data will be presented and structured or presented to the model during its training;
- The way in which this data will be stored.
For this last problem, there are several solutions.
We can mention among others: cloud storage solutions such as Drive, AWS... and many others that exist on the market when you can't afford these large volumes of cloud storage. For example, we think of local storage on hard disks (as is the case when you are a student).
These numerous storage tools are interesting, but they don't provide all the possibility to do data versioning, just like Git helps us to do code versioning (which is its primary specificity). Also, these tools don't offer the possibility to be used as simply as Git is. Here, we refer to phases such as :Télécharger le contenu de notre dataset stocké sous forme de zip.
- Downloading the content of our dataset stored as a zip file.
- Unzipping the file.
- Update the dataset used to teach the model.
- Upload new data to the cloud storage when we have it.
- Make sure we don't have duplicate data on the cloud storage, which is of no use especially when we are paying for this storage volume.
- Having to repeat this task every time we improve our dataset or when we change computers to work on the same project.
That's why using practical tools that can do these checks for us and make sure that our data is used correctly can be useful and above all save us time (being a computer engineer also means simplicity and sometimes ease, that's my credo).
It is in this pursuit of simplicity that I will introduce, in a series of articles, two tools that I have discovered that are extremely powerful and that can be of great use to you. These two tools are Data Version Control (DVC) and Rclone. I will be introducing DVC in this first article, with a brief presentation of the tool, the installation, the basic commands that will allow you to manage your data efficiently and my opinion on this tool.
1 - Presentation of Data Version Control
Data Version Control is an ML data and experience management tool that leverages the existing set of versioning tools and engineering practices with the goal of simplifying the implementation of ML projects, from the dataset construction phase to its deployment and monitoring phase (https://dvc.org/doc). It can be useful in the following use-cases, among others:
- Tracking and logging data as well as ML models in the same way as code tracking;
- Creating and easily switching between versions of data and models;
- Comparison of metrics between two models (more on this in a future article);
- Adoption of engineering tools and best practices in data science projects.
You can imagine that with all these features, DVC can be a great asset in the management of ML projects and can be easily integrated into an MLOps process which is becoming an important focus nowadays.
2 - Installation of DVC
DVC can be used on different operating systems (macOS, Windows, Linux) and on different environments (virtual or not) depending on which one you prefer. If you like simplicity like me, you will opt for the basic installation method which is (if you have installed Python) :
pip install dvc
Get more details on the installation options by following the link https://dvc.org/doc/install. Now that DVC is installed, let's move on to what we're interested in, which is data management.
3 - Basic commands for data management
Presenting DVC in its entirety would take us a long time. However, we can focus on the useful commands to retrieve your data from your cloud storage. For that you are served, because DVC can be used with :
- Amazon S3;
- Google Drive ;
- Google Cloud Storage;
- Local remote;
- And many more (https://dvc.org/doc/command-reference/remote/add).
We'll use Google Drive storage in our use case, leveraging existing engineering tools like Git, DVC offers an array of similar commands that are sure to please.
3.1 - Initialization of the directory
As with Git, you must initialize the directory, just to specify that you will use DVC in it. So the command is :
dvc init --no-scm
Note that the --no-scm option is useful when your directory is not used by a versioning tool. So you will have the following result in your folder :
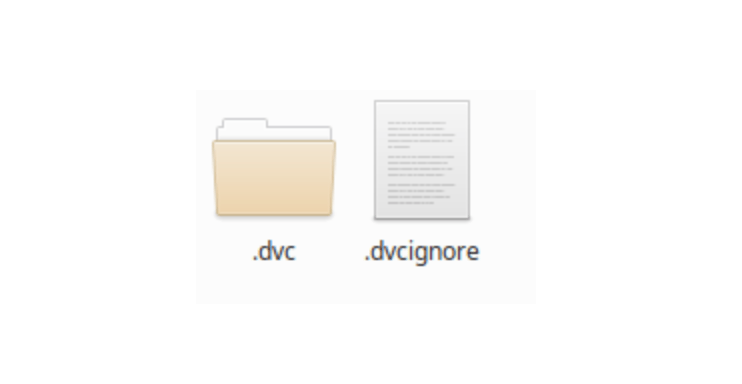
Something very similar to Git with the .dvc and .dvcignore to ignore folders and files that you don't want to submit to your drive storage, in an ML project, could be the written code, the obtained model or the configuration and environment files.
3.2 - Creation of a folder for our dataset
It would be much more convenient to have your dataset in a sub-folder of your working directory. So think about creating a folder for it and add your data (images, audio, .csv files depending on your project).
Under Linux, make a :
mkdir data
3.3 - Add your data to your .dvc and make a commit to keep a current snap
Now add your data to DVC with the command :
dvc add data
And commit to keep your stage:
dvc commit
Your working directory now looks like this:
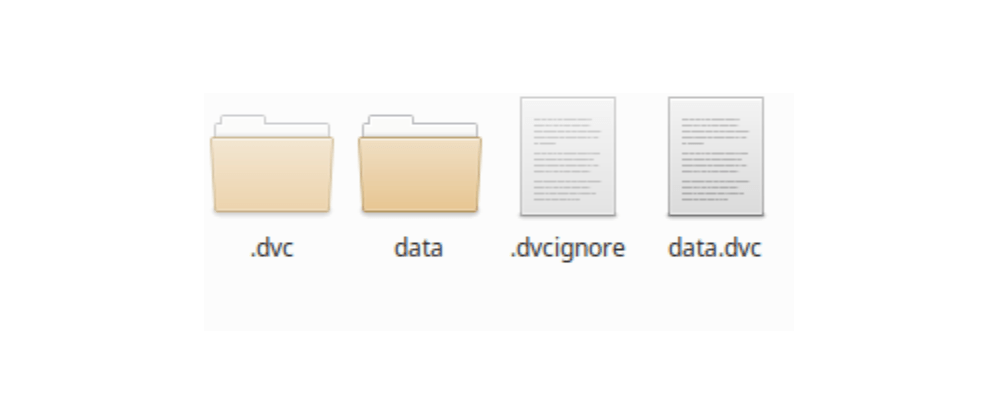
The file I find interesting is the data.dvc which keeps the history of your additions and can be shared, especially if several people have access to the data.
3.4 -Linking the directory with our cloud storage
For this part, you will have to use the following command:
dvc remote add -d nom_de_votre_remote url
Example :
dvc remote add -d driveStore gdrive:Identifiant_dossier_sur_drive
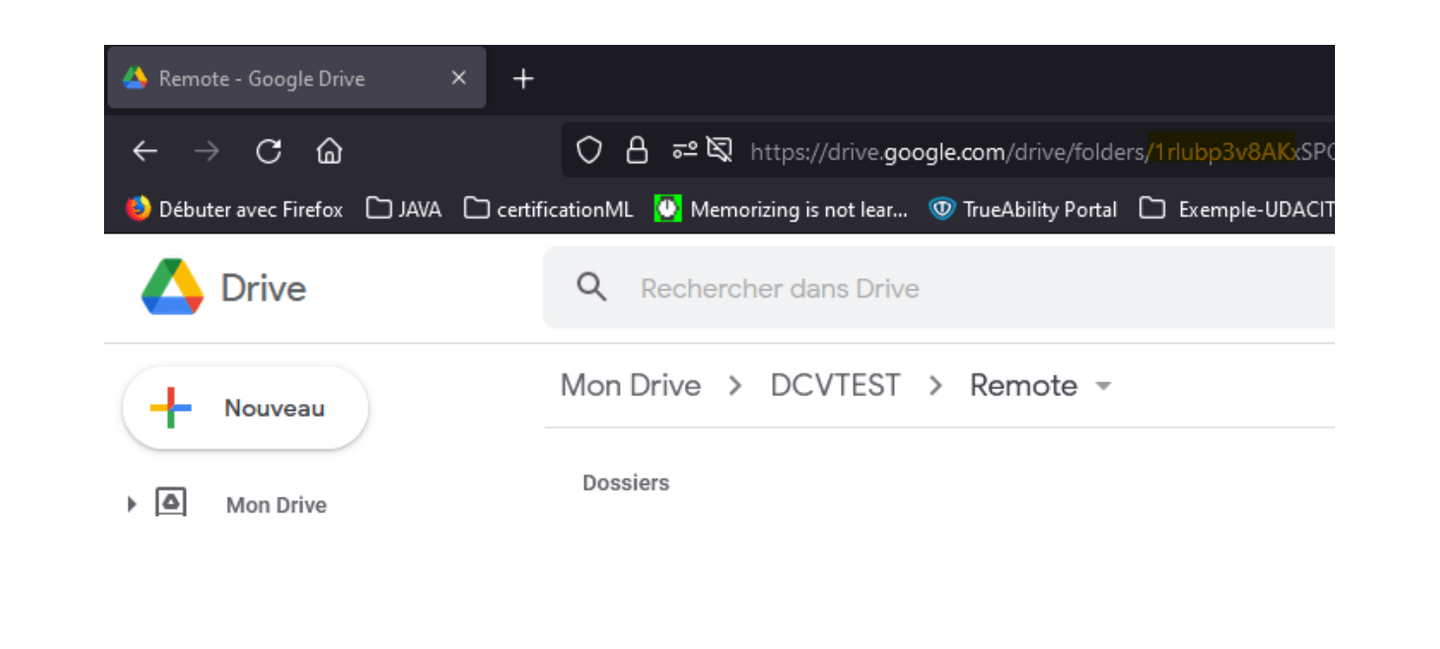
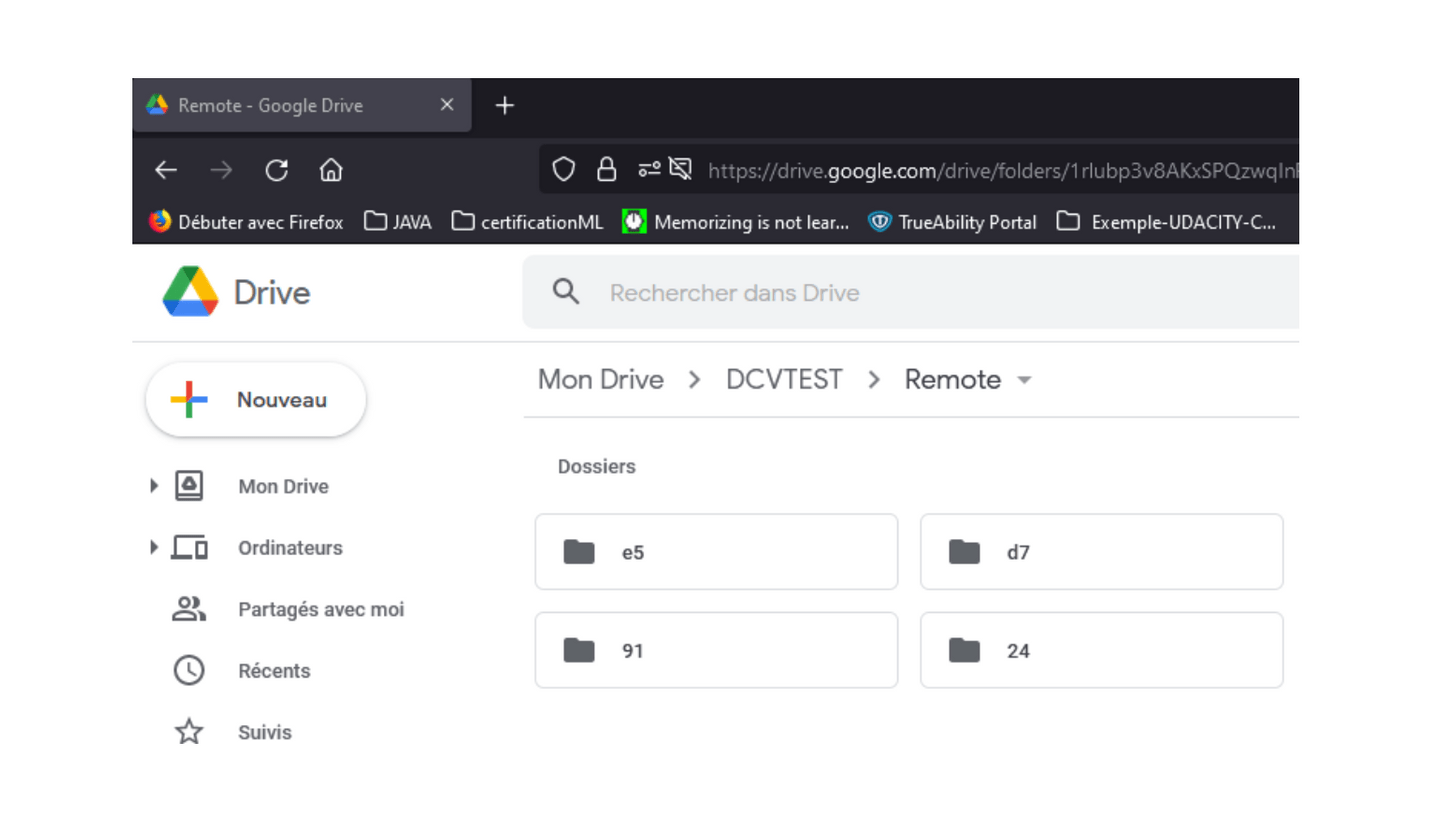
To retrieve this identifier after creating your folder on your storage, you just have to copy it in the URL of your browser: refer to the id in yellow in the following figure.
You will see a link to give the permissions to DVC, read it and, if you are happy with it, you can continue.
3.5 - Push your dataset to your storage
And as you can imagine, the command to do this is:
dvc push
Your data is thus available on your drive in the same folder where you have linked your local directory. It is true that these do not exactly reflect the data on your local machine, but be sure that your data is there and we will come back to this detail in the last part.
3.6 - Recover the data
To retrieve the data, use the command:
dvc pull
In the case of a shared folder, you must remember to also share the data.dvc file which is the key to your remote storage. Thus, your colleagues will have to do the following steps after installing DVC:
- dvc init --no-scm
- dvc remote add -d driveStore gdrive:folderid ondrive
- copy the data.dvc to their working directory
- dvc pull
3.7 - Other commands
DVC is not just about data management and you can do even more interesting things with it throughout your ML project. Feel free to use the available help:
dvc --help
Also check out the commands available for the other use cases mentioned above at the https://dvc.org/doc/command-reference link.
4 - My opinion on DVC
As mentioned throughout this article, DVC allows you to do several things (see use-cases), including data management, which we covered together in this first article on the subject. It is very easy to use, starting from its installation. It also allows us to easily store and retrieve our data with simple commands very similar to the commands used by Git. However, there are a few points to highlight that do not diminish the effectiveness of DVC. These include the presentation of our dataset on our Drive storage folder which can be confusing. Added to that is the fact that we have to share the data.dvc for more consistency between the data. Of course, by combining DVC with Git, sharing this file in your project is a simple matter.
Here we are at the end of the introduction to DVC that we did together. In the next article, we'll talk about Rclone and compare it to DVC, and, who knows, maybe Rclone will take away the few blind spots we currently have. Feel free to check out the DVC site, test the tool, share the experiences you've had using it, and most importantly share what other data management and/or data versioning tools you've used. Your opinions and comments are also welcome.
Photo Credit: Grovemade

Did this article start to give you some ideas? We’d love to work with you! Get in touch and let’s discover what we can do together.