Development

10 tips to boost your efficiency in VSCode with the Vim emulator extension

How Vim magic got me
A while ago, I was introduced by an enthusiastic senior colleague to the world of Vim. For those who are not familiar, Vim is a “highly configurable text editor built to make creating and changing any kind of text very efficient. It is included as "vi" with most UNIX systems and with Apple OS X.” You can use its Insert mode to type as usual, or switch to Command mode, which makes your whole keyboard commands, instead of just the usual few like Ctrl-Something.
After watching my colleague show off his favorite commands to do complex, swift and chirurgical text editing, without ever touching his mouse, I was quite impressed. That being said, my initial comment was: “but aren’t we just looking and thinking about code without typing like 80% of the time? Are you saving that much effort, given all the time it most certainly took to learn this stuff?”. My colleague lost his smile and went back to his desk scratching his chin and questioning his life decisions…
Fast forward a couple months later, I gave it a first try. It wasn’t very intuitive at first. Eventually, by practicing methodically like I used to do with my guitar, it started to feel a bit more fluid. I was witnessing all the potential, even though I was still very slow. I abandoned it for a while, and then a few months later, I decided to commit to it for a few weeks and soon enough I was like Jimi Hend… That guy with the chipped Yamaha at the metro station.
All my practice took place inside the default Vim editor of my Linux machine. At some point, I felt ready to start coding for real. Being used to VSCode, I discovered how Neovim, an hyperextension of Vim, could be configured to match most of the same features, but without ever touching a mouse. I was in for a long ride of configuration and having to learn a ton of other commands from other plugins (tmux, etc), while I was just touching the tip of the iceberg with Vim.
Thanks to a few YouTube videos by Ben Awad on the topic, I quickly discovered that a Vim extension existed for VSCode (it does for most popular IDEs also). That meant I could benefit from the wonderful features of VSCode, still use the mouse when I felt like it, and transition smoothly towards using more of Vim commands. The perfect combo of efficiency. VSCode on steroids.
Here are some loose tips I wanted to share for your VSCode + Vim journey. I’ll go over powerful Vim features and useful configurations. If we had time I would sneak in some guitar tunings, but you’ll have to wait for that.
Take it slow and have fun
It’s not trivial to become a Vim master (I don’t consider myself one). You can quickly learn the basics and gain a bit of efficiency. Like me, you can try it from time to time and put it at rest if it feels overwhelming. I saw it initially as a hobby and always prioritized becoming a better developer, before becoming a faster one. Have fun! There is even an online game that helps you learn Vim.
Start by owning your typing game
The Vim commands mapping is well adapted for the standard typing position (index fingers on “f” and “j”). Plus, there are a lot of useful commands using the numbers and special characters. Needless to say you should make sure to be comfortable with typing, without having to look at your keyboard. I personally had a really bad typing technique, not even using all my fingers, so I initially had to relearn how to type correctly, before I started Vim. The added bonus will be to type faster emails and Slack messages.
If you feel stuck, just press “i” and use VSCode as usual
The advantage of using a Vim emulator inside VSCode, is that at any time, you can just switch to Insert mode by pressing “i” — which in Vim means you can start typing text — and VSCode will become its old self again (mouse included). That is how you can still use the great VSCode features, like multi-cursor, which are sometimes more convenient than what Vim offers.
Swap the Caps Lock and Esc keys
We just saw that pressing “i” gets us into Insert mode. To get back to Command mode, we need to press Esc, but that key is not the nearest one from the default typing position, so Vim users rarely use that, and opt for a custom mapping. My personal favorite is swapping the Caps Lock and Esc keys, which can be done in various easy ways, depending on your operating system. Other popular options are a quick “jj” typing or “jk”.
Get that good settings.json setup
Vim has special commands with some of the Control/Command + key combos, but most are not as useful as the regular ones, in my opinion. You can easily override these Vim mappings in your VSCode settings.json files. There are a lot of other customization options. That’s the beauty of Vim, you can really mold it to your work preferences.
{ "keyboard.dispatch": "keyCode", "vim.handleKeys": { "<C-c>": false, "<C-v>": false, "<C-w>": false, "<C-f>": false, "<C-a>": false, "<C-b>": false, "<C-q>": false }}
Learn how to move around like a pro
The first thing you will learn is how to use “h j k l” which represent “← ↓ ↑ →”. It feels a bit odd at first because of the index finger switch, but you’ll soon get used to it. However, it’s not efficient to quickly move around, so I advise you to explore all the options. Here are a few:
- “e”, “w” and “b” will help you jump from word to word

- “^”, “0” and “$” to get to the first word / beginning / end of the line
- “{“ and “}” is very useful in code files to jump up and down blocks of texts (functions, objects, etc.)
- “zz” will center your active line in the middle of your window
Use that Vim macros dark magic
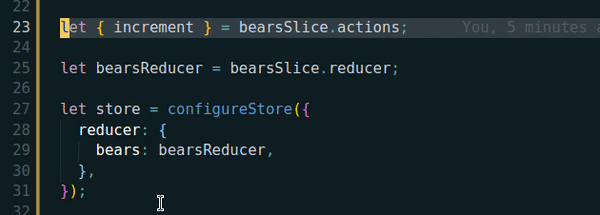
You won’t always use macros, but it is definitely one of my favorite features of Vim. One that truly feels like a superpower when you need it. When you press “q” and then any other letter key, let’s say “w”, you can record a series of commands and store them in that letter. You press “q” again to stop recording. Then, you can use “@w” to use that series of commands again. If used smartly, you can even do, for example, “10@w” to repeat an operation on ten lines of code. It sounds a bit confusing, but let me show you an example, where I change one format to another in seconds:
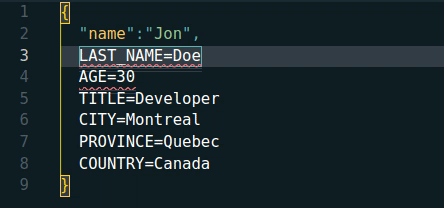
I recorded the operations I wanted on the first line, and then simply repeated that six times with one quick command. Imagine how much time you save for a file with a thousand lines !
Learn what’s more specific to code
Even though you can use Vim for any sort of text editing, the more complex syntax and structure of a code file is where it shines. Think about what you often do in a code file and see if there is a Vim command that can help you achieve it more efficiently. Here are some examples:
- “*” can be used to jump between instances of the same word (hello variables / functions)

- “ct}” for example (which could be translated to “change to }”), will delete everything before the bracket and put you in Insert mode

Pay attention to repetitive actions and get rid of them
You are catching yourself pressing “j” ten times in a row to go down some lines? Press “10j”. Same goes for jumping 4 words ahead, just do “4w”. Another useful one is “.” that will repeat the last command you did, a little bit like a mini macro.
There are many ways of achieving the same results. Pick your favorite and move on with your life
That’s all part of the fun with Vim. You practice a new command and integrate it into your workflow. Then you eventually discover an even more efficient one, and you repeat the process. Don’t stress out too much about using all the most optimal features and go at your own pace.
Useful resources
Here are some resources I found useful in my Vim journey:
- Official Vim website
- The VSCode Vim extension documentation
- Vim interactive tutorial
- Vim tips
- A great crash course by Ben Awad
- Vim cheat sheet
- Vim Adventures (learn while playing)
If you want to read more interesting and informative blogs take a look at our software development section and if you want to learn more about the world of Vim do not hesitate to reach out to us!
Photo credit: Pedro Costa

Did this article start to give you some ideas? We’d love to work with you! Get in touch and let’s discover what we can do together.